Part
3b (The second game)
Hi again people:
To see my previous reports, click here.
Here is Part 3b, the sequel to Part
3a. *Bet you didn't see that coming*
This time around, there is a JPG
picture for every whole move; that is, White and Black; in the main text.
For chess-illiterate readers and raters, the reason why there aren't more
pics is: A) The whole report already steals over 2 megs worth of BR.com
bandwidth; B) It takes a helluva time to make all of these, and C) I don't
want to hurt my poor fellow 56kers, especially the ones who didn't read my
previous warnings.
Again, comments in green
are SC analogies, and don't spam my comments
section about the report's infinitism.
Oh, and now the game is much more hard-fought than
the other one.

Game two
This game was in the same tournament, but in
an earlier round. I have an 100% record against my opponent.
Me: White, Rating 1787
Opponent: Black, Rating 1178
1. e4
Again, a King's Pawn Game, usually a quick
and fast way of playing, although admittedly it can be VERY boring at times. I
just wanted to have a 'fast and easy' game.
1... c5 Another Sicilian
Defense, aiming for the open c-file.
2. Nf3 Same as in the other
game, getting my forces out.
2...Nc6
This time, a little
different. The Sicilian is probably the most complex chess opening ever,
because there are so many different variations of it. (Just
like positive map imbalance) In
this one, Black develops the knight immediately, but loses the flexibility
of getting the knight to d7, which is what happened in the previous game here.
3.d4 I expected Black to play
the previous move, and quickly played this (obvious) move.
3...cxd4 Same principle as in
the previous game.
4. Nxd4 Not much to say here
either.
4...e5!?
But this is quite
interesting, Black attacks the knight, forcing it to move, and hoping to
be very active. In return, he gets an awful hole at d5.
(A 'drop hole', say right outside the mineral line there is a ring of
pylons with no gap. Imagine dropping a tank or two in there)
5. Nb5 Getting the knight out
of danger, and aiming at the d6 hole.
5...d6
Plugging the gap (Placing
a photon cannon in the gap mentioned above)
however, d5 is still weakened. Weak squares are important, because if they
become severely weak then the defending side will have no play.
6. N1c3 Developing the
knight, and controlling d5.
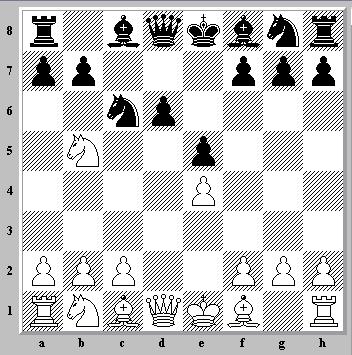
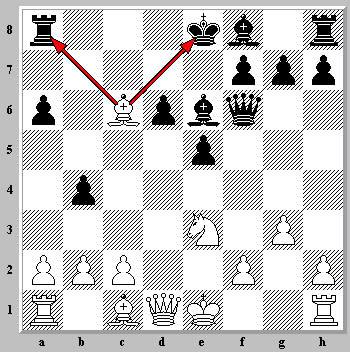
6...a6
Kicking the knight
away to the square a3, where the knight will be bad (Ever heard the
principle 'Knights on the rim are grim' or something to that effect?)
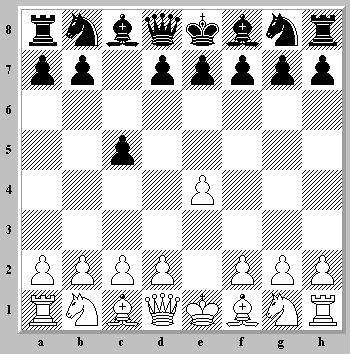
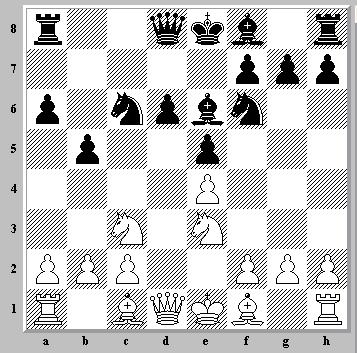
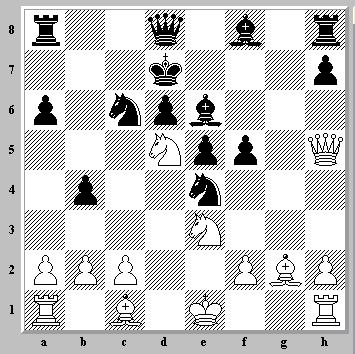
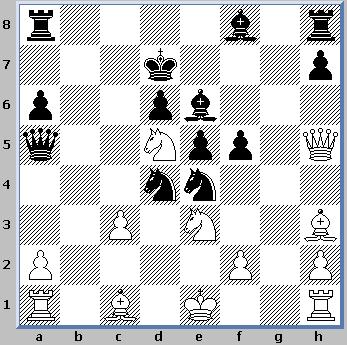
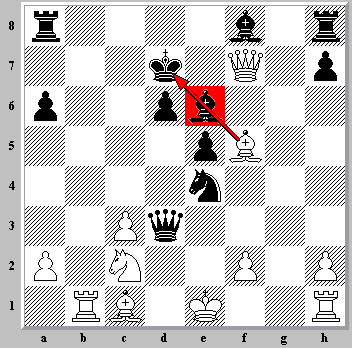
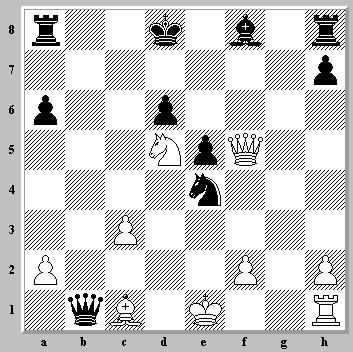
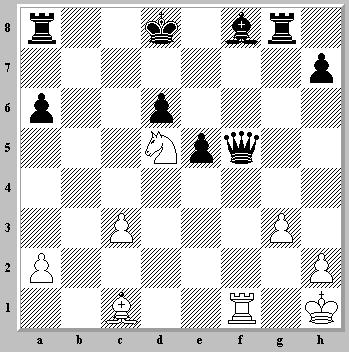
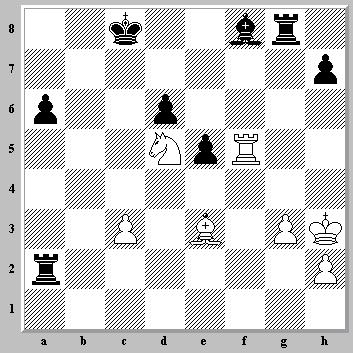
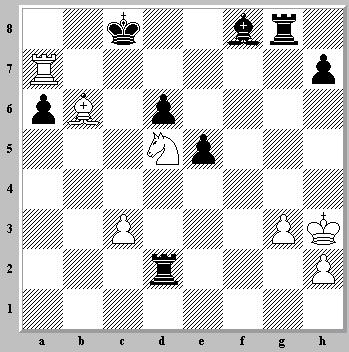
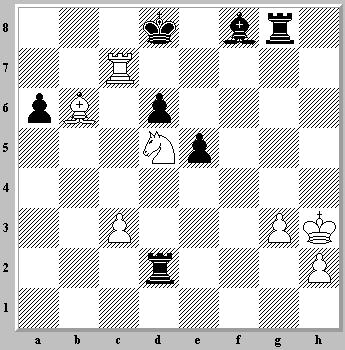
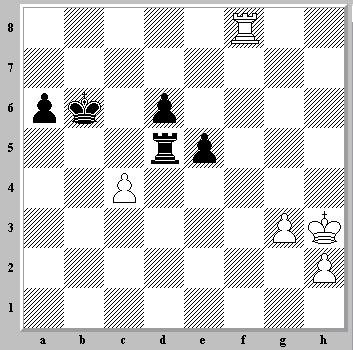
leading to the position:
7. Na3 Now the
knights are prone to a fork via b7-b5-b4, however it is well known
here that this cannot happen.
7...Be6
For
instance, if Black plays the natural but mistaken 7...b5? then White
simply plays 8. Nd5 with the idea c2-c3, Na3-c2, then a2-a4! and Black's
queenside is in shreds. (Bad
building placement)
Of course, Black also plays three moves, but this
plan can be quite dangerous.
8. Nc4
The
knight is heading to e3, where it supports the critical d5 square. There
is also an alternative in 8.Nd5... but that is a possible story for
another time.
8... b5 This
time, it is safer since White has no immediate break, Black having played
Be6 and controlling d5.

9. Ne3
The only
logical move, heading for d5. Nevertheless, this does retard White's
development, and Black seeks to 'refute' that, even though it is the book
move.
9...Nf6 Still a
'book' move, developing a knight and controlling e4 and d5, the two
critical centre squares.
10. g3
Fianchettoing the bishop, planning to place it on g2 where it provides
additional protection over the aforementioned squares.
10...b4!?
Apparently
a novelty. The usual move here is 10...Rc8, however statistics show that White scores
excellently in that variation. This move seems to challenge White's plan,
by winning the e-pawn by force. In compensation, White may get a chance to
hunt down the black king in the centre. (Kind of
like imbalance)
11. Ncd5 After
being a little surprised, I decided to go along with the best-looking
move, placing the knight on d5.
11...Nxe4
Grabbing the 'free'
pawn. However, Black must suffer greatly just to hold onto it. There were
no real alternatives; for example 11...Nxd5?? 12.exd5 picks up a piece, or
11...Bxd5? 12. exd5 Ne7 13. Bh3!
and Black is in deep trouble; his forces
are un-coordinated and his light squares are weak. (a
permanent disability: like the opponent having map control)
Besides, 11...Nxe4 is
logical with his previous move.
12. Bg2 The only
move, skewering the knight. Other moves fail to get any real compensation
for the pawn.
12...f5
Also the
only move, otherwise Black simply gets crushed, for example 12...Nf6?? 13.
Nxf6+ Qxf6 14. Bxc6 forks off the rook,
and, well, Black doesn't have too much
choice, so that's why he plays 12...f5: to support the knight. (Holding
on to a valuable source of income)
13. g4
Undermining the base of
the 'pawn chain'. In chess, a series of pawns defending each other with an
undefended base is called a pawn chain. If the base is undermined, then
the whole thing is doomed to fall. (If
there were multiple levels of cliffs as in Warcraft 3, then it is like
tank pushing from cliff to cliff. If the first cliff is taken by enemy
tanks, then the whole thing falls apart)
13...g6
As I said, the base
needs to be supported. The point of 13. g4 was to undermine the support of
the e4-knight, therefore 13...g6 adds defense to the base. (Adding
defense from a higher cliff in the scenario above)
14. gxf5 This is
done for a tactical reason; you'll see why.
14...gxf5 An
obvious recapture, leading to this scenario:
15. Qh5+
The whole point: the
king is now forced to move out, since 15...Bf7? 16. Qxf5 leads for a
catastrophe for Black. With the move played, Black has to live with a
shaky king. However, it is incredibly difficult to actually get to it! The
reason is because of the huge pawn mass in the centre, and the fact that
my king isn't too safe either! (You
hold just about all the vital expansions, but the opponent has more units
and almost total map control)
15...Kd7 Forced
and good! Actually, White's position isn't that easy, and just to prove
it, I already made a mistake:
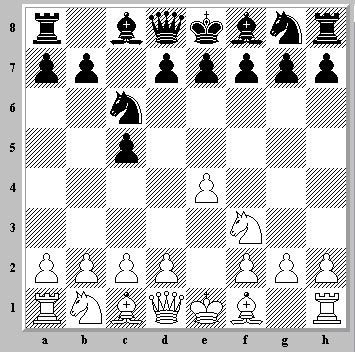
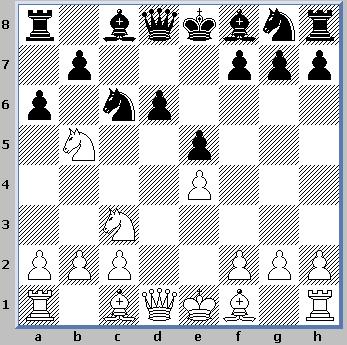
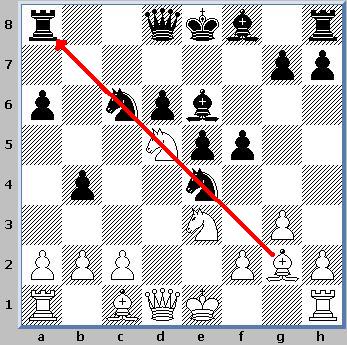
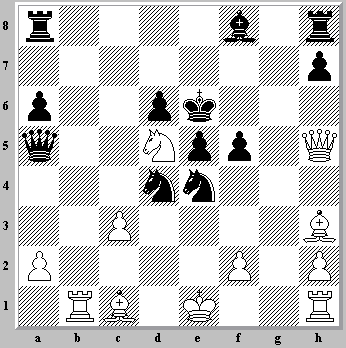
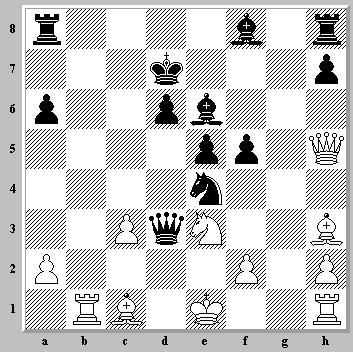
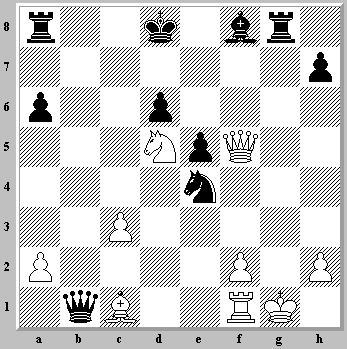
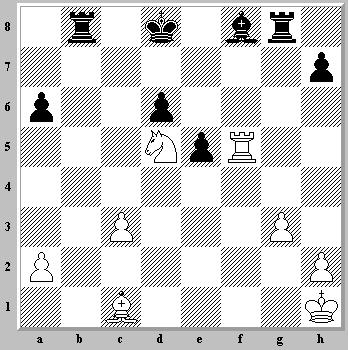
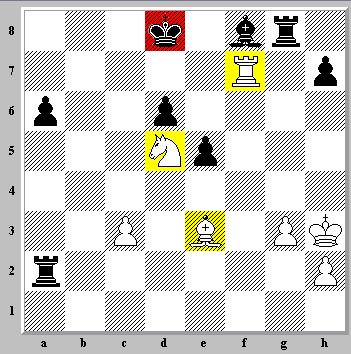
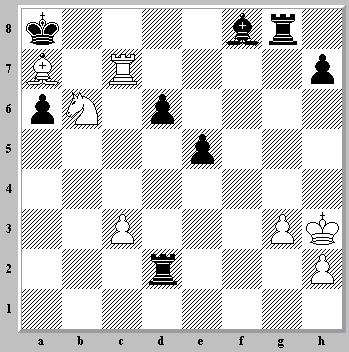
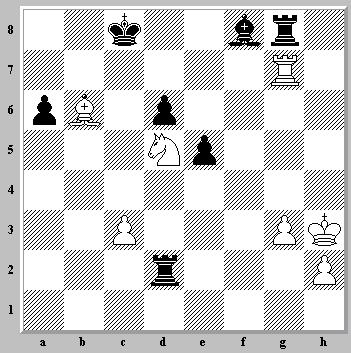
16. Bh3?
A bad move: takes away
control of the centre squares. Not to get too complicated into details,
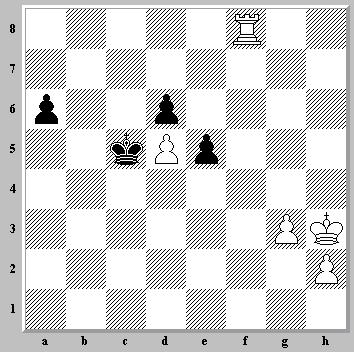
but 16. c3! bxc3 17. bxc3 Kc8 18. Bxe4! fxe4 19. Qe2! gives White an
enormous advantage due to the plan you can see in the diagram:
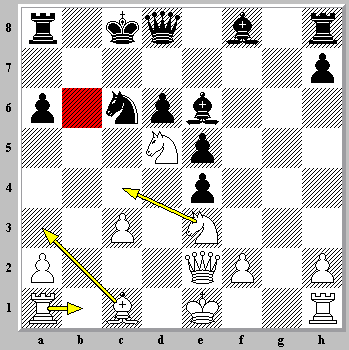
In short, Black's position here is very
weak. Too bad this didn't happen :(
16... Nd4
Now it is already apparent
what I had done. This good move gives additional protection to f5, and
attacks c2 as well. Black has the unpleasant threat 17...Qa5! attacking
the loose knight on d5. (Game starts to get
sour, pea-brain)
I started to get annoyed at what I had
done right now. :(
17. c3 Attempting
to chase the knight away. Correct me if I'm wrong, but other moves seem to
fall short of the mark.
17...bxc3
A good move, opening
lines for his pieces and trying to get at my king. As I said before, it
may even be more vulnerable than Black's king!
18. bxc3 An
obvious recapture.
18...Qa5
Pinning the pawn to my
king, and attacking the knight. You can see how hard my position is now.
There is only one good move here, and guess what - I failed to find it!
19. Rb1?
I wanted to be able to penetrate to b7
to give some annoying checks, but nevertheless this is the wrong choice. (A
bit too undefended base) The correct move is 19.
Bg2! although Black still keeps an advantage after 19...Rb8! moving off
the dangerous long diagonal, where Black should still keep an advantage.
Now White is much worse.

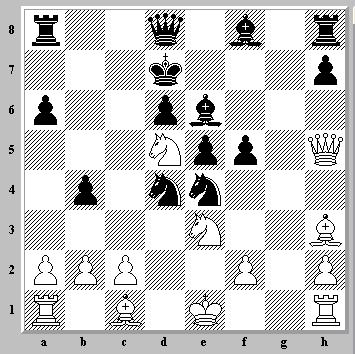
19...Nc2+?
Called a 'deflection',
this forces the knight to take it, which makes the other knight en
prise (can be taken). Nevertheless this is also a bad move. Better was
19...Bxd5! 20. Nxd5 Ke6!! and Black is clearly better.
As it stands now, the position is
actually equal.
20. Nxc2
Forced. If I play any
other move, say 20. Kf1? then 20...Nxe3+ 21.Nxe3 Qxa2 is terminal,
threatening 22...Qxf2# and 22...Qxb1.

20...Qxd5
A natural recapture of the knight. Now,
AGAIN, I played the wrong move!!
21. Ne3?
The correct move is
simply 21. Bxf5. My rejection for this move was 21...Qd3?? but 22. Qf7+
simply wins the bishop for nothing! The bishop can't take the queen
because my own is pinning his to the king T_T.
As it stands now, I'm actually losing,
after:
21...Qd3!
This simple move threatens 22...Qxb1,
22...Nxc3 and 22...Qxc3+! In desperation/frustration,
I played a weird move that is, in hindsight, completely incorrect. But
what else could I do?
22. Bxf5!??
The whole point of this
move is to change the complexion of the game completely. My plan is to
abandon my queenside rook so I could just get to his king with my measly
forces. (Imagine the
following, a TvP LT game. Your plan to crack his wallin with
zealots/probes failed, and same went for your follow-up to DTs.
Your opponent has taken not only both his naturals, but also an island
expansion, while you're struggling just to hold your first natural. He just
launched a successful turbo-newbie to that natural, blasting your probes
into the next millennium. In desperation, you send what's left of your
forces to his natural. Caught by surprise, he stupidly line-dances his
forces back for defense, enabling you to pick them off one by one. Both
his naturals are wiped out, then his main falls. You manage to get back
not only your own natural, but several other expansions. You win a lost
game.) The SC analogy
illustrates that suddenly changing the complexion of the game can reap the
desired results sometimes. This is what I'm trying to do here, where
psychology plays an important role.
22...Qxb1
Of course! "The only way to refute
a gambit is to accept it!"
23. Bxe6+ The
only move.
23...Kxe6 Getting
back his bishop, however exposing his king, which enables me to get some free
hits in.
At this moment, I thought, just maybe,
maybe...
24. Qf5+ Also
the only move.
24...Ke7 Not
much to say here either.

25. Nd5+ Advancing
the knight and pushing the king back.
25...Kd8 Now I'm
presented with a new problem: how to press on.
The solution comes in a rather brave
move:
26. 0-0!?
The whole point
is to unpin the bishop, and incidentally, it threatens to win the queen by
26. Bg5+. However, the king exposes himself, and the threat never
unleashes.
26...Rg8+ A good
move, activating the rook and forcing the king to move.
27. Kh1 Forced
as well, 27. Bg5+?? loses to 27...Rxg5! when White remains a piece down.
27...Ng3+?
A reasonable idea, but
it was poorly executed. A much
better option was 27...Nxf2+!,

28. Qxf2 Qe4+ 29. Qf3 Qxf3+,
when compared to
the game, I'm a pawn down. A VITAL pawn down.
But an even better
idea was 27...Qb5!! stopping all threats and effectively then I'm a rook
down. Hehe. My opponent was obviously over-anxious to trade queens.
28. fxg3, and definitely
not 28. hxg3?? Qxf5.
28...Qxf5 Now
the only way, as all other moves actually lose!
'Who is God of
this site?' 'Johnny_Vegas. He is all
knowing and omnipresent.' -[FLS]Prozerran. I'd like to shed some evidence
to prove that's not true.... :)
29. Rxf5 Getting
back the queen.
29...Rb8 Activating
the rook. However, my opponent's purpose for that move was much different
to what I feared.
30. Bg5+
Developing, and trying
to get some sort of initiative. Remember, I'm still down the Exchange (a
bishop/knight for a rook, in this case a knight), but I still may have
some sort of chance.
30...Kc8 Sidestepping
the check, and avoiding 30...Ke8?? or 30...Kd7?? which are both met by 31.
Nf6+.
31. Be3 Now that
the bishop has done its job in dislocating the king, it returns to control
the vital b6 square.
31...Rb1+ Not
really unnecessary, but, fair enough, it's a check.
32. Kg2 More or
less forced. (Mark4 tries to find another legal king move)
32...Rb2+ This
is also unnecessary, but if Black plays correctly, he can still win...
which he doesn't!

33. Kh3 May as
well, to get the king to play and still guard the h2-awn.
33...Rxa2?
But what a poor move! The
rook is now temporarily out of
play, and White can use this to his advantage to attack the Black king.
Better was 33...Rb7! to hold the seventh rank, after which all counterplay
is stopped and Black should win easily.
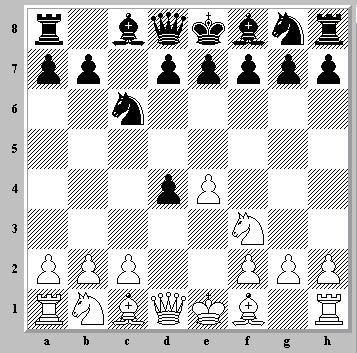
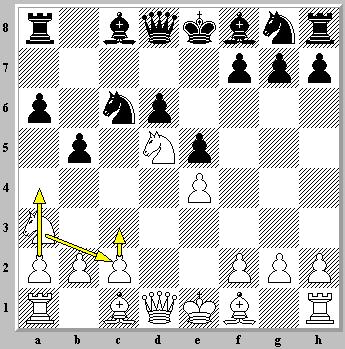
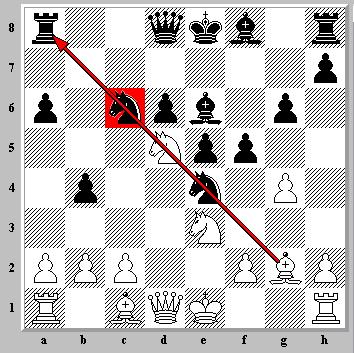
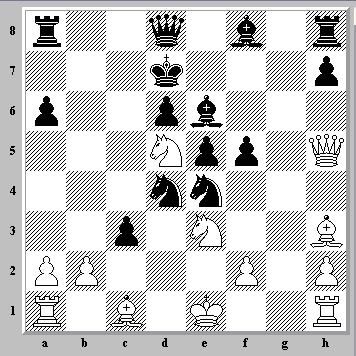
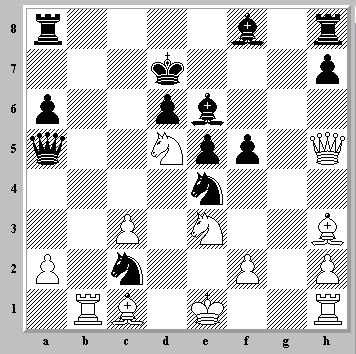
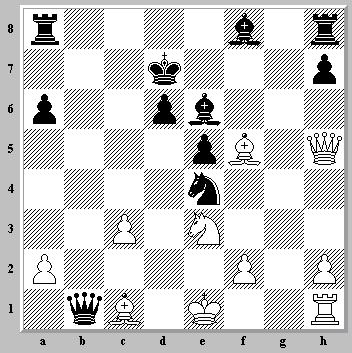
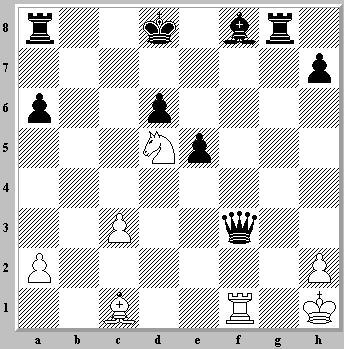
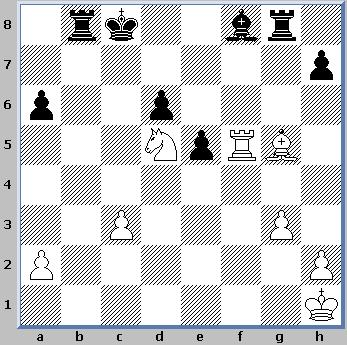
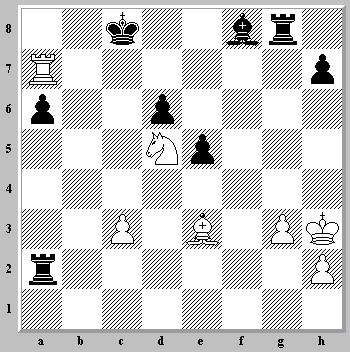
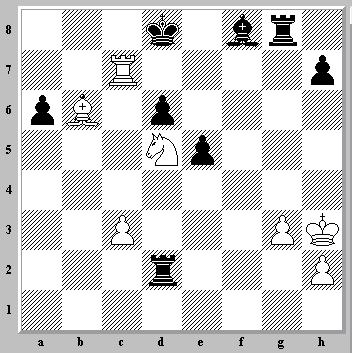
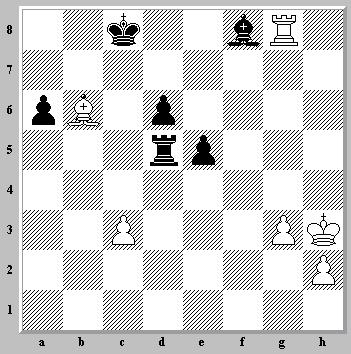
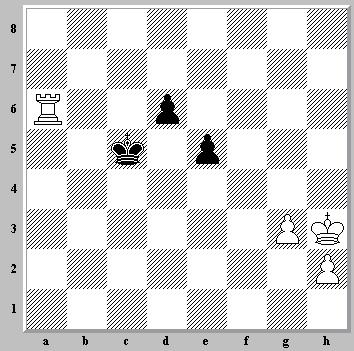
34. Rf7
Some of you may think
why I don't, or didn't play 34. Bh6?! earlier. The question mark is for
the actual value of the move, while the exclamation mark is for the
apparent value of the move. With 34. Bh6?! White can win a bishop, but
then after 34...Bxh6 35. Ne7+ Kd7 36. Nxg8 Kc6, his king is let out and
Black can win easily.
The diagram should explain what is
going wrong had I played that inferior move.
34...Kd8
It is already seen that
White holds a dangerous initiative. With my next few moves, I aim to
stymie the opponent with mating threats and win of material.
35. Ra7 Threatening
35. Bb6+! with win of a whole rook or the black king. (Check this out
yourself)
35...Kc8 The
king is not happy at all.
36. Bb6!?
I can actually draw
here, by just bringing my rook where it came from. But psychology plays a
very important role here, and Black obviously felt very depressed him. (No
need for this) Besides, now Black has only one
move here.
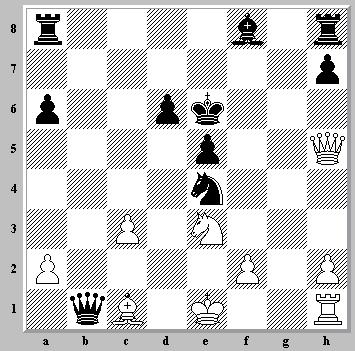
36...Rd2?
This is one of the many
losing moves available. The move which not only saves him, but gives him
an advantage, is 36...Rb2! forcing the knight to keep its position, and if
the bishop moves, then ...Rb7 relinquishes the seventh rank.
Now, suddenly, I am winning!
37. Rc7+ The
only good move, and a winning one!
37...Kd8 If
37...Ka8, then 38. Ba7+ Ka8 39. Nb6# is lol.
However, Black is
losing anyway because White can use a discovered check to win a pawn, then
the rook. (The opposite to using
a barracks to physically prevent a Zerg to broodling a ghost launching a
nuke, me thinks)
38. Rxh7+ No
need yet; the rook won't run away.
38...Kc8 If
38...Ke8? 39. Nf6#.
39. Rc7+ Back
again.
39...Kd8
Notice that the position would be exactly the same, except that the
h7-pawn is no longer there.
40. Rg7+ Time to
win the rook. Black could resign here.
40...Kc8
Again, 40...Ke8? 41. Nf6# is the similar
theme.
41. Rxg8 Time to
win the rook. Now I've gone to material down to material up. Yay!
41...Rxd5
Taking the knight, which is what 36...Rd2
aimed to do. Too late now.
42. Rxf8+ Winning
the immobilized bishop on f8. Notice, too, that it never moved.
42...Kb7
Forcing the bishop to move.
But how about...
43. c4...no!
Fixing the d6-pawn as a target, I force the rook to move to an inferior
square.
43...Kxb6!??!?
The punctuation needs explaining. The first ! is for the surprise value,
the ?? for the true value, and the !? for the 'interesting move' em,
thing.
Obviously better was 43...Rd3, though
after 44. Ba5 White still should win easily.
44. cxd5 <TIME>
There must be an alternative...There must be an
alternative...</TIME>
45...Kc5 Going
after the pawn. What else? None.
45. Ra8 Getting
the precious a6-pawn.
45...Kxd5
Not great, but there was nothing else.
White is obviously owning now.
46. Rxa6 Removing
the offender.
46...Kc5
Trying to prepare the advance.
47. Kg4 Mobilizing
the pawn.
47...d5
A last desperate try from Black...
48. h4...before
the only thing he can do is wave the white flag. Seeing this, my opponent resigned, and silently
cursed me. :/ (Bad manner)
There is no way out; the black pawns
will be easily stopped by the rook and king, while the white h-pawn just
blasts to promotion.
1-0
GG! That was an especially tough game.
My opponent did well in the opening stages, especially when I blundered.
However, he started to stuff up when I initiated my counterplay against his king,
and consequently fell apart.
Lessons learned/other points:
-
Do NOT be overconfident. Such a
repeated mistake.
-
SC=War3.
-
This NOT will be my last
report with idiots in it. Sorry if you are disappointed at me.
-
Chess can be a painstakingly
difficult game at times.
Just one thing: hope you enjoyed
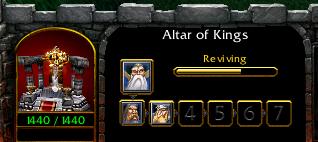
them both. They are on PGN (Portable Game Notation) Format on the
hopefully blue-bordered Altar
Screen, unfortunately unannotated. (Bonus game: I demolish a 1557-rated player in a
short, complex struggle)
Part 4 could be out from tomorrow until next year.
Hopefully it will be ready in only two-three weeks.
It will be on SC, I
promise.
This has been a
report.
gpattack@msn.com
|
 Home
Forum
Starcraft Tournaments
Home
Forum
Starcraft Tournaments

