New Page 1

A Game Of
Armored Combat
Hello and welcome to another Psyonic_Reaver installment!
You're in for a real treat today folks! A real life Battlereport! Please hold
the applause while I continue. Today's Battlereport will be on the BattleTech
Universe and the people who live there AKA my brother and I battle on a 22in. x
17in. hex board each with a Lance at our disposal. A Lance is combined of 4
Mechs, usually two heavier type Mechs, a medium Mech, and a light Mech.
Now I just want everybody to know that the people playing
this game are HUMAN, mistakes will be made on both sides but will not be
mentioned. Therefore if you are knowledgeable about this game and catch
something that is wrong, PLEASE DO NOT BUG ME ABOUT IT. I do not CARE.
When I make comments during the game they'll be within (and colored this
color).
--WARNING--This BR will be probably be over 20megs of
pictures so I’m going to be spreading it out over several BR’s and include
this big long intro. to the games basic functions to help you pass the time as
the pictures load.--END WARNING--
Now I'm going to list what kinds of terrain there are and what
they do along with other aspects of the game you might want to learn more about
to know what I'm talking about later on. If you don't really want to read about
it then skip to the beginning of the report.
--------------------------------------------------------------------------------------
Open Ground: No bonus to defense. 1MP to move over. So it
will cost one "movement point" to cross each Open Ground.
Light Forest: +1 to hit, light cover. 2MP to move into but
only 1MP to move out of. So it will cost two "movement points" to
enter into the light forest but only one to leave. Not to mention it makes your
Mech harder to hit. But if you have to shoot though a light wood to hit a Mech
on the other side the other Mech gets the bonus. Got it yet? Good.
Heavy Forest: +2 to hit heavy cover. 2MP to move into but
only 1MP to move out of. So it's the same as above, except your Mech gets a +2
to hit instead of +1.
Cliffs: There are three levels of elevation. Level 1 covers
about half your Mech and costs 2MP to move onto or climb up. Level 2 covers your
entire Mech and cannot be accessible from the ground, you must be on a Level 1
to move onto a Level 2 which costs 1MP. Level 3 is one and a half times taller
then your Mech and is not accessible from the ground or a Level 1, you must be
on a Level 2 in order to move onto a Level 3 which costs 1MP. Now keep in mind
that if I was to jump or walk off a Level 3 cliff I would have to make a
piloting roll using two dice and get a combined roll of six or higher to remain
standing. If I get lower then that my Mech falls down causing damage. Fun stuff
huh guys?
Water: There are only two levels of water. Level 1 is about
ankle-deep and it costs 2MP to move into and it also gives a bonus to cooling
your Mech off 6 Heat Points (HP) but makes you -1 to hit AKA easier to hit.
Level 2 covers everything but the head of your Mech and costs 4MP to move into
from a Level 1 AND nothing can hit you, but you can't fire out. This also cools
off your Mech 6HP. If you were to fall into it from open ground you would have
to make a piloting roll to see if your Mech would remain standing after falling
so far.
Is everybody writing this down? No? Good. I'll try my best
to explain for the first couple of rounds how movement and heat works then I'll
cut it off and just do that writing thing I do.
Some more basic info before we start:
1) Initiative is at the beginning of each round. Each
player each roll one die, the one with the lowest roll has to move his Mechs
first. If the players roll the same number, they re-roll. The benefits of
winning the Initiative round means you can watch where your opponent moves and
then react accordingly to his moves.
2) Hits occurred during battle are simultaneous. So damage
effects do not happen until the end of the round.
3) SRM means Short Range Missile, an SRM-6 means it is a
SRM that fires 6 missiles. A LRM means Long Range Missile, an LRM-15 means that
it is a LRM that fires 15 missiles.
4) Basic Heat, Damage and Range Table for Weapons
Heat Damage
Range (In Hexes)
4 6
8 (Rolls you need or higher to hit)
Short / Medium / Long
Machine Gun- 0
----- 2 -----
1 / 2 / 3
Flamer-
3 ----- 2 ----- ""
""
Small Laser-
1 ----- 3 ----- ""
""
Medium Laser- 3 ----- 5 ----- 1-3 / 4-6
/ 7-9
Large Laser-
8 ----- 8 ----- 1-5 / 6-10 / 11-15
*PPC-
10 ----- 10
----- 1-6 / 7-12 / 13-18
*Auto Cannon- 1 ----- 5 -----
""
""
Long Range Missiles
~5 Rack-
2 ----- # ----- 1-7 / 8-14 / 15-21
~10 Rack-
4 ----- # ----- ""
""
~5 Rack-
5 ----- # ----- ""
""
~20 Rack-
6 ----- # ----- ""
""
Short Range Missiles
2 Rack-
2 ----- ^ ----- 1-3 / 4-6 / 7-9
4 Rack-
3 ----- ^ -----
""
""
6 Rack-
4 ----- ^ -----
""
""
*=Minimum Range is 3 / ~=Minimum Range is 6 / #= 1 point of
damage per missile that hit / ^= 2 points of damage per missile that hit.
If you try to fire closer then Minimum Range with weapons
that have a Min. Range, all your attacking rolls get +1 for every Hex closer
they are to you. So if an enemy Mech is in a Hex next to a Mech using a PPC then
that Mech would have to use the Short Range roll, so a combined roll of 4 or
higher will hit, but since the enemy Mech is an extra 3 Hex's closer then it'd
bump it up to 7 to hit instead of 4.
5)
Heat Point Table
Activity
Heat Points
------------------
---------------------
Walking
+1 per turn
Running
+2 per turn
Jumping
+3 per Hex (min. of 3 per turn)
Trying to Stand Up
+1
Weapon Fire
See
the weapons chart above
Heat Sinks
-1 per sink operation (Heat Sinks help lower your Heat Points, so that you
may move again or fire weapons)
-1 additional for heat sink under water (6 max.)
1st Engine Critical Hit +5
per turn
2nd Engine Critical Hit +10 per turn
6)
Critical Hit Effects Table
/-Life Support- 1 point of damage to MechWarrior per turn heat is 15 - 24
Head |-Cockpit- MechWarrior is dead. Mech is out of the
game.
\-Sensors- 1st hit: +2 to fire. 2nd hit: No fire.
Torso Area|-Engine- 1st hit: +5 heat per turn. 2nd
hit: +10 heat per turn. 3rd hit: Mech Destroyed.
|-Gyro- 1st hit: +3 to all piloting rolls 2nd hit:
Mech Destroyed.
Arms|-Shoulder- +4 to hit with ranged weapons.
|-Arm Actuator- +1 to hit
|-Hand- Cannot fire hand held weapon.
Legs|-Hip- 1st hit: MP is halved. 2nd
hit: No movement
|-Leg Actuator- -1MP and +1 to all pilot rolls
Weapons: Weapon destroyed.
Jump Jets: Jump Jet destroyed.
Heat Sink: Heat Sink destroyed.
Ammo: Ammo explodes doing damage to Internal Structure and
the MechWarrior takes 2 hits.
7) A MechWarrior is the pilot of a Mech. If the Head is hit
or Ammo explodes then the MechWarrior takes a hit.
Consciousness Number
1st
2nd
3rd
4th
5th 6th
(3)
(5) (7)
(10) (11)
(Dead)
--------------------------------------------------------------------------------------
Let's get ready to RUMBLEEEEEEE!!! By showing you the map
of the playing field.
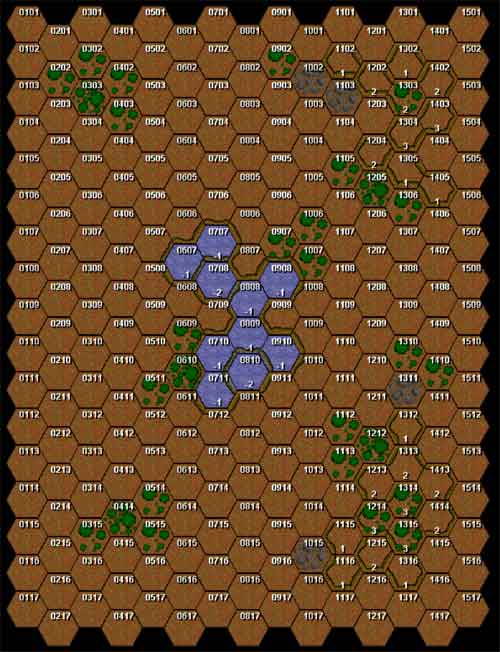
As you can see it's pretty much even on both sides except
for the large pool of water in the center of the map.
Now lets introduce the players!


Aren't they sexy studs? I'm the one that is trying to look
cool and impressive and my
brother is holding the dinosaur. Hey, he doesn't like being stalked alright?
Now here's the list of Mechs that Psyonic (Me)
choose for his
Lance. His color of choice is Blue.
(Note: I've given each Mech a "pilot" and a color so its
easier to distinguish who's who.)
--Smurf Lance--
-Sgt. Psyonic.Smurf will be commanding the Mad-3R Marauder
Heavy Mech. It weighs 75 tons and its movement points are: Can walk 4 hexes, run
6 and jump for 0. Its arsenal includes two PPC's, two Med. Lasers and an Auto
Cannon.
-Lt. Buckeye.Smurf will be piloting the BLR-16 Battlemaster
Assault Mech. It weighs 85 tons and its movement points are: Can walk 4 hexes,
run for 6 and jump for 0. Its weapons includes a PPC, six Med. Lasers (two
facing the rear), an SRM-6, and two Machine Guns.
-Prt. Tyrant.Smurf will be engaging with his TDR-55
Thunderbolt Medium Mech. It weighs 65 tons and its movement points are: Can walk
4 hexes, run for 6 and jump for 0. Its inventory includes one Large Laser, three
Med. Lasers, an SRM-2 and an LRM-15, and two Machine Guns.
-Prt. Dino.Smurf will be taking point with his WSP-1A Wasp
Light Mech. It weighs 20 tons and its movement points are: Can walk 6 hexes, run
for 9 and jump for 6. Its offensive capabilities are one Med. Laser and one
SRM-2.
And here's STIM's (My
brother) Mechs. His color of choice is Red.
--Stim Lance--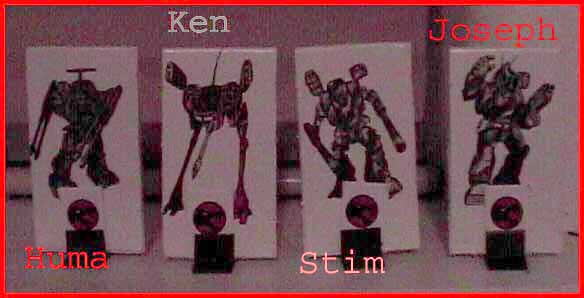
-Sgt. STIM will be commanding his customized Mech the DF-1
Defender Heavy Mech (Which will be represented by the Warhammer Icon). It weighs
70 tons and its movement points are: Can walk 5 hexes, run for 8 and jumping is
0. Its arsenal includes one Large Laser, two Med. Lasers, one SRM-6, and four
Machine Guns.
-Lt. Joseph will be piloting the BLR-16 Battlemaster
Assault Mech. It weighs 85 tons and its movement points are: Can walk 4 hexes,
run for 6 and jump for 0. Its weapons includes a PPC, six Med. Lasers (two
facing the rear), an SRM-6, and two Machine Guns.
-Prt. Huma will be engaging with his RFL-3N Rifleman Medium
Mech. It weighs 60 tons and its movement points are: Can walk 4 hexes, run for 6
and jump for 0. Its inventory includes two Large Lasers, two Med. Lasers, and
two Auto Cannons.
-Prt. Ken will be taking point with his LCT-1V Locust Light
Mech. It weighs 20 tons and its movement points are: Can walk 8 hexes, run for
12 and jump for 0. Its offensive capabilities are one Med. Laser and two Machine
Guns.
Y'all ready for this?

North side of the map facing South: STIM
--Mech Starting Positions--
Defender on Hex 0102 -- Rifleman on Hex 0601 -- Locust
on Hex 0801 -- Battlemaster on Hex 1502
South side of the map facing North: Psyonic
--Mech Starting Positions.--
Wasp on Hex 615 -- Thunderbolt on Hex 816 -- Marauder
on Hex 916 -- Battlemaster on Hex 1016
Round One. Ready? Go!
Stim wins the Initiative. Psyonic moves
first.
--Movement Round--
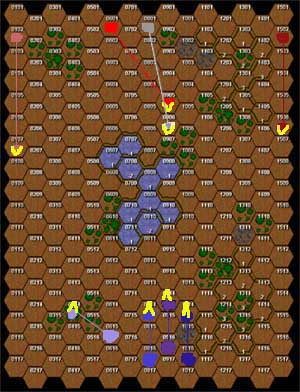
This where the Mechs are at the end of the movement round. The yellow arrows are where their facing.
Psyonic keeps his main force together while sending the
Wasp out to the left to engage STIM's Defender with his SRM's.
Stim, hoping to surround his enemy, keeps his troops spread
out trying to flank the main attack force.
--Attack Round--
Stim -- Stim's Defender takes a pot shot at the enemy Wasp
with its Large Laser but misses. Meanwhile, Huma's Rifleman lets off with its
two Auto Cannon's at the closing Thunderbolt. One of the AC's hit in the Right
Leg causing 5 damage to the armor there. Joseph has his Battlemaster take the
Rifleman's example and fires off its PPC nailing the Thunderbolt in the Right
Arm for 10 damage. Now Ken's scouting Locust shoots its Med. Laser at the
leading Marauder but the shot goes wide.
Psyonic -- Dino's Wasp fires off its SRM-2 in return fire
at the Defender but the missiles lose their lock and thud into a nearby hill.
The Thunderbolt, after shrugging off the damage done to it, returns fire on the
Rifleman with its Large Laser but Tyrant was still a bit shaken from that last
AC hit and his shot misses. Now the Buck's Battlemaster sets its sights on the
scouting Locust and opens up with its PPC and two Med. Lasers. The Lasers miss
but the PPC nails the Locust in the Left Torso searing off its armor and scoring
a critical hit on its internal structure, disabling its Left Shoulder. Psyonic
(Marauder) decides to finish the Locust by letting off with his Auto Cannon and
one of his PPC's but misses by a long shot.
Round Two. Ready? Go!
Psyonic wins the Initiative. Stim moves
first.
--Movement Round--

--Attack Round--
Psyonic -- The Wasp is in no position to attack and forfeits its turn. Buckeye, feeling lucky, trys to hit the Locust with his PPC again but, sadly, misses. Tyrant, his honor on the line, aims his PPC and one Med. Laser on the Locust, scoring two hits! The PPC tears into the Right Arm dealing 10 damage while the Laser sears the Left Arm for 5. Both of these weapons cause internal damage and thus a critical hit is scored on each Arm's Actuator! Making it almost impossible for the Locust to use the Machine Guns
that are positioned in each arm, but the Med. Laser is fused onto the Center
Torso and is fully charged... Finishing up Psyonic's attack is the Marauder
which blasts away with a PPC, a Med. Laser and a Auto Cannon. The PPC and the
Laser miss their intended targets but the Auto Cannon burrows into the Right Leg
causing 5 damage on the enemy Battlemaster!
Stim -- The Locust, hurt but not dead, fires away with it's
Med. Laser at the Thunderbolt. Tyrant bearly managed to avoid the blast and
escaped unscathed. Stim's Defender warms up it's Large Laser and lets go at the
Thunderbolt but also but misses. Huma's Rifleman also takes up the task of
shooting at the Thunderbolt and two Med. Lasers and two Auto Cannons fire
towards it, but only managed to hit it with one Auto Cannon in the Left Leg
causing 5 damage to that area. The Battlemaster, ignoring the closer Marauder,
opens up on the Thunderbolt with a PPC and two Med. Lasers but horribly missing.
Round Three. Ready? Go!
Stim wins the Initiative. Psyonic moves
first.
--Movement Round--

--Attack Round--
Stim -- Ken decides a new target is in order and rotates
his Mech to set it's sights on Dino's Wasp, firing away with its Med. Laser but
missing. STIM lines up on the Wasp also with two Med. Lasers, an SRM-6, and it's
four Machine Guns but misses also. The Rifleman opens up again with two Med.
Lasers and two Auto Cannons on the Thunderbolt and in taking more time to
actually AIM at the Mech, manages to hit with everything but a Med. Laser. All
the weapons hit the Thunderbolt's Center Torso and an Auto Cannon manages to
break though one part of the armor to cause a critical hit! (If you roll snake
eyes you get a Crit. Hit automatically) One of the Thunderbolt's engines
explodes! Causing the Mech's heat to skyrocket by 5 Heat Points. Joseph, out for
revenge, attacks the Thunderbolt with a PPC and a Med. Laser, badly damaging the
Mech's Right Torso for 15 damage.
Psyonic -- Dino opens fire with his SRM-2 and his Med.
Laser at the Locust but his shots go wild. Tyrant, seriously pissed, noticed
that the Locust had its back to him. A common battlefield rule about firing at
the back of an unaware opponent was un-honorable but another known fact was that
Mech's had 90% lower armor on their backsides then their fronts. Tyrant opens
fire with is Large Laser and his SRM-2 anyway. While the Missiles flew past the
Mech, the Large Laser melted into the Locust’s Rear Center Torso for 8 damage
and continues in and through the Mech! The Locust stumbles for a few seconds
before suddenly exploding. (When that happened I jumped to my feet and did the
boogie dance and said "Booya who’s your mama?" Yeah, I'm nerdy like
that.) First blood goes to the Smurf Lance! Psyonic, grinning from ear to ear,
opens up with his PPC, a Med. Laser, and an Auto Cannon. His excitement must of
gotten in the way of common sense though as he wasnt aiming at anything. Buckeye's
Battlemaster, originally planning on firing on the Locust, fires a PPC and two
Med. Lasers on the distant Rifleman but there must of been a cross breeze and
the weapons miss. (My older brother walked past and made my rolls sucky. Stupid
breezes.)
Round Four. Ready? Go!
Psyonic wins the Initiative. Stim moves
first.
--Movement Round--

--Attack Round--
Psyonic -- The Wasp has managed to move in behind Huma's
Rifleman and fires off its Med. Laser and SRM-2, while the laser misses, the
missiles lock onto the Mech's Rear Right Torso, tearing off its armor and
hitting internal systems. Luck was on Dino's side as one of the missiles score a
critical hit on the Shoulder, essentially making the Auto Cannon and Large Laser
in the Right Army useless. The Battlemaser fires off its PPC and Med. Laser
missing the Rifleman, but a last second attack with an SRM-6 hits for 8 damage
to the Left Torso. The Thunderbolt also fires on the Rifleman with two Med.
Lasers, scoring a hit on the Left Leg and Arm each causing 5 damage. Wrapping up
Psyonic's attack phase is the Marauder which lets loose with, you guessed it, a
PPC, a Med. Laser and an Auto Cannon on the closing enemy Battlemaster.
Surprisingly, The PPC strikes the Right Arm for 10 damage, while the Med. Laser
and the Auto Cannon strike the Left Leg and Left Torso for 5.
Stim -- My brother is worried now, he was one Mech short,
his forces were spread too thin and he had an enemy Wasp flanking his Rifleman.
Never-the-less, STIM orders his Defender to fire on the wounded Thunderbolt with
his SRM-6 and two Med. Lasers but again his shots go wild. The damaged Rifleman
still has willpower to fight and opens up with two Auto Cannons and two Med.
Lasers on the Thunderbolt. Huma scores an AC hit on the Left Arm for 5 damage,
while the Med. Lasers scorch the Left Leg and Right Torso for 5 damage each. Now
the Battlemaster returns fire on the Marauder with a PPC and two Med. Lasers but
another cross breeze screwed up his shot as well. (Take a guess who walked by
again. ^^)
Well I hope you guys like it so far! Hope it was an easier read too! Part2 coming at you soon!
-Psyonic_Reaver Home
Forum
Starcraft Tournaments
Home
Forum
Starcraft Tournaments

